
The school summer holidays are just around the corner. Your children are probably pretty tired by now, especially if this has been a SATS year. The long break gives them the opportunity to relax and regain some of that lost energy. Whilst the kids do need some downtime, you might feel that your child would benefit with some educational input over the summer holidays, just to keep those basic skills, such as literacy and numeracy, ticking over. It’s here that a summer holiday project can be helpful.
What Is A Summer Holiday Project?

Like the projects your child might do at school covering a certain topic, such as the Tudors or Space, a summer holiday project involves a series of activities that are all based around a chosen theme. Whilst this article covers the theme of archaeology, the theme could be anything that your child is interested in (and many of the tasks here can be adapted to suit your chosen theme). For example, you could choose insects, electricity, vehicles, fashion, or even your local town.
How Does It Work?

Using your chosen theme, you can then plan various activities and trips throughout the holidays. Some might be short, five-minute tasks, others might be day trips to a museum or something similar. You can take photos and your child can add to a scrapbook after each task. They could write a sentence or two about what they have learnt, or older children could write a longer, diary style entry. They can collect stickers, tickets, and other memorabilia to add to their scrapbook, and do their own drawings that can also be included.
Planning is the key to a successful project. Depending on your work, childcare, and holiday commitments, you could plan to have a set day each week when you work on the project. Planning the tasks in advance means that it’s more likely you will go ahead with the project, as you will probably find it harder (and less motivating) to try and think of an activity on the day.
Finally, it’s worth remembering that the project should be something fun for your child, to help them engage with learning willingly. There is no point persevering with an activity if it just results in tantrums.
Six Weekly Tasks For An Archaeology Project
Archaeology is a great pick for a summer project, because there are so many different areas to explore within the topic. Revealing our history, archaeology allows us to explore the events of a few thousand years. Below you will find a six week plan, but the weeks can be swapped around if the weather requires it.
Week One – Introduction To Archaeology
Why not start your project with a trip to the local library to look at books about archaeology? Reading with your child is very beneficial to their literacy skills. If you haven’t got a library near you (or the children’s section at your local library is pretty dire), then have a scour through local charity shops for books.
This week your child can also start their scrapbook. They could add a cover to the scrapbook with paper and design their own front cover. They could also use the books from the library to write some facts about the topic. Facts they might want to research could include:
- What are some of the most famous archaeology finds?
- What is the difference between “prehistoric” and “historic”?
- What type of tools to archaeologists use?
- Can you list ten things an archaeologist might find on a dig site?
Week Two – Visit To A Museum
Museums are brimming with archaeology finds. Furthermore, you don’t have to travel to some of the biggest museums, such as the Natural History Museum, to see some interesting objects. Local museums in your hometown will often have items that have been found in the area, and will have lots of information about the history of the place. You might discover that your home town was once the site of an important battle, trading post, or Roman fort.
Lots of museums offer worksheets for children to complete as they go around the exhibits, and these worksheets would make great additions to your child’s scrapbook. You could take your own pens and paper and ask your child to do a drawing of their favourite object, or they could take a picture to add to the scrapbook later.
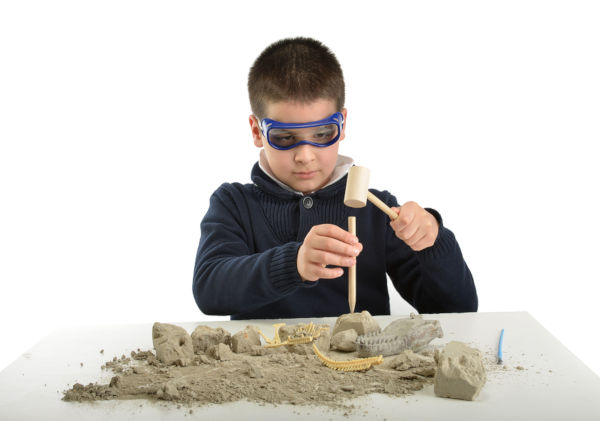
Week Three / Rainy Day – Dinosaur Fossils
For this activity, you could first spend some time with your child online researching about fossils, or perhaps refer to the library books again. You could look up answers to questions, such as “What is the largest fossil ever found” and “how are fossils formed”, for your child to write in their scrapbook. You can combine this with a fossil activity. If you have some cash to spare, you could purchase a dig set. This is a great activity for a rainy day, though it does create quite a lot of mess!
Alternatively, you could make your own dinosaur fossils. Create some salt dough by mixing equal weights of salt and plain flour with a volume of water equivalent to half the weight (i.e. 250g salt, 250g flour, 125ml of water). Knead the mixture well for around ten-minutes and then taking a handful at a time roll out into a circle about 2 cm thick. Press a small plastic dinosaur toy into the circle to make an impression. Bake in the oven on a medium heat for around an hour until it has set hard. The “fossils” can be painted after. You don’t have to use dinosaurs if you don’t have any. Any small toy would work. You could use Lego mini-figures, Peppa Pig figures, farm animals, etc. After, you and your child could try to imagine a story of how the fossil came to be and your child could write in their scrapbook, adding photos of the fossils.
Week Four – Fossil / Ancient Site Hunting
The task for this week is an opportunity to get outside and explore your local area. Beaches are generally the best places to find fossils, so if you have a beach near you then you could combine working on your project with a bit of sandcastle building and an obligatory ice cream. Consider taking along a magnifying glass to help you identify the really tiny fossils. Many fossils are found in cliff faces but remember safety is paramount, so stick to hunting around the bottom of cliffs, and be aware of incoming tides. Other places where you might find fossils are abandoned quarries, with hundreds dotted around the country. Again, you need to stay safe, especially when around loose rock, and don’t venture into any caves unless you are certain it is safe to do so. The National Trust and the UK Fossils Network both have guides on where to find fossils in your area.
If you don’t have any places near you that are suitable for fossil hunting, then check out the Megalith Map. Here you can find a list of ancient sites, such as burial mounds and stone circles in your area. You could pack a picnic and make a day of it by doing a walk around the area. Take some paper and crayons so that your child can do some stone rubbings, etc.
Week Five – Grow A Crop Mark
One way that archaeologists determine where they should do a dig is to look at how crops are growing in that area. If there is a buried wall or a ditch, then the crops will grow differently. A buried ditch will result in taller crops, as the ditch has usually collected more nutrients than the rest of the soil, whilst a buried wall will result in shorter crops because the wall gets in the way of the plants roots, hampering growth.
You can help your child to visualise this by creating your own crop mark, using that old favourite, cress seed. You will need a small plastic tray, such as one that a take away might come in, some compost, small stones, cress seeds, and cling film. Place a line of stones along the middle of the tray, and fill the rest of the tray with soil, covering the stones with a thin layer. Sprinkle the cress seeds all over the tray and add some water. Cover with cling film (or put in the green house if you have one) and place it by the window. Remove the cling film once the seeds have spouted and water regularly. After a week, the crop mark will be highly visible, with lots of cress either side of the stones, and very little in the middle.
Week Six – Movie Night
Celebrate the end of your project with an archaeology themed movie night. Firstly, make some Roman snacks as a sweet treat to nibble on during the movie. Libum is a Roman cheesecake and the recipe comes from Cato’s “De Agri Cultura,” a manuscript that is believed to date back to 160BC.
Then you can choose a movie. The obvious choice would be an Indiana Jones film, but it is PG rated and you may want to check out the Common Sense Media reviews before you do. The Adventures of Tintin offers a more family friendly alternative, and although is not strictly on the topic of archaeology, it does involve seeking answers from hidden clues and treasures.


