
School run mornings are hard. It’s the one time of day that you can guarantee that your child will adopt the pace of an elderly snail and you have a limited amount of time to get them dressed, fed, and out of the door. So needing to find time to make a packed lunch is something you could really do without.
Having something that you can simply pull out of the freezer and place straight into the lunchbox makes it all so much quicker and easier. What’s more, you get rid of the need for ice packs to keep things like yogurt cool, as the defrosting food does that job instead. All of these recipes can be made in advance and frozen in portions, plus they’re guaranteed to be a hit with fussy eaters.
Turkey Meatloaf Slices
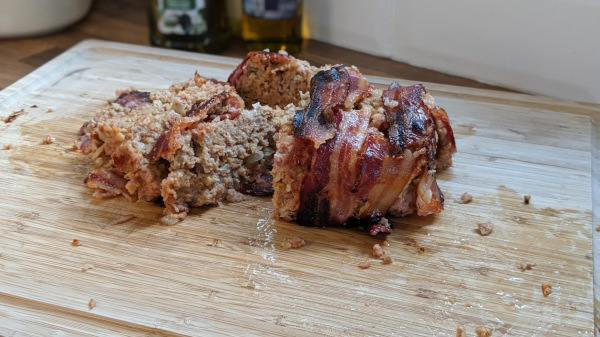
Meatloaf is great for packed lunches. It can either be served by itself in slices as a protein boost, or in a sandwich. It’s easy to make and you can add your own seasoning to suit your family’s tastes. This recipe makes enough to feed a family of four during the evening meal with enough left over for a few packed lunches, meaning that you can get more than one meal sorted at the same time. We’ve used turkey here, which is a super lean meat, but pork and beef work just as well.
Ingredients
- 500g of lean turkey mince
- 100g of breadcrumbs (either from a packet or you can make your own with slightly stale bread)
- 1 egg (beaten)
- 1 onion
- 1 tablespoon of BBQ sauce (You can use ketchup as an alternative, or seasoning of your own choice)
- 1 300g pack of streaky bacon
- 1 tsp of oil
Method
- Pre-heat the oven to 200 degrees C and grease a 2lb (900g) loaf tin.
- Line the greased tin with strips of bacon so that each streak starts at one side and goes across the middle up the other side of the tin, with the ends hanging over the edge (to be folded over the top of the mixture). Leave a couple of streaks to one side for the top.
- Finely chop the onion and shallow fry it in the oil for around 5 minutes to soften it. Set aside and leave to cool.
- Mix the turkey mince with the breadcrumbs, egg, and sauce. The best way to mix it is to use your hands, though a fork is also quite effective.
- Finally mix in the cooled onion.
- Put the mixture into the tin and press it firmly in. Fold the ends of the bacon strips over the top so that they are encasing the mixture and lay the remaining two strips along the top to completely cover the mince.
- Bake in the oven for around one hour.
- If you are serving it hot, then allow the loaf to rest for a few minutes before tipping it out of the tin onto a board. If you are planning on freezing the entire loaf in portions then it is best to let it cool before removing it from the tin and slicing, as it will be firmer. Wrap each portion individually in cling film and place in a container or bag before placing into the freezer.
Banana Flapjacks
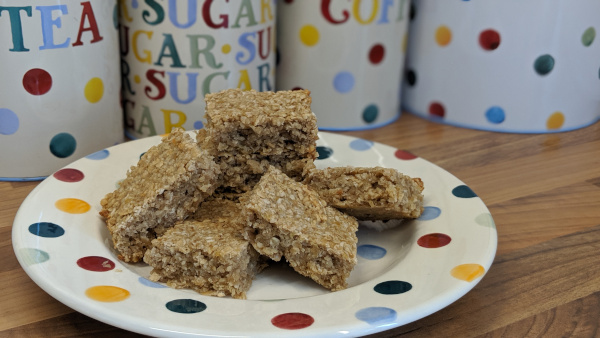
Kids love a sweet treat in their lunch boxes, but it can be hard to find something that both satisfies your child’s sweet tooth and meets the guidelines for lunchboxes set by the school. These banana flapjacks have less refined sugar than regular flapjacks, since much of their sweetness comes from over ripe bananas. They’re great for using up bananas that are past their best and are simple enough to make that it’s something your child can get involved with. This recipe makes around 15 flapjacks.
Ingredients
- 250g porridge oats
- 2 ripe bananas
- 50g butter
- 50g light brown soft sugar
- 2 teaspoons runny honey
Optional Ingredients: 50g of raisins, chopped fruit such as dates, sesame seeds, etc.
Method
- Pre-heat the oven to 200 degrees Celsius and grease a 20cm square baking tin.
- Using a fork, mash the bananas into a lumpy puree.
- Melt the butter in a saucepan, or in a microwave. If you are using a microwave, try heating it for around 10-15 seconds a time to avoid the butter exploding.
- Mix the melted butter with the sugar and the honey and stir well. Add in the banana puree and mix.
- Add the oats and stir well until all the oats are coated.
- Spoon the mixture into the baking tin and using the back of the spoon press it into the tin and smooth it out so that it is evenly spread.
- Bake for around 20 minutes, or until golden brown.
- Once cooled, slice into portions. To freeze, wrap each individual portion tightly in cling film and place into a bag or tub before putting in the freezer.
Cheese & Tomato Pizza Wheels
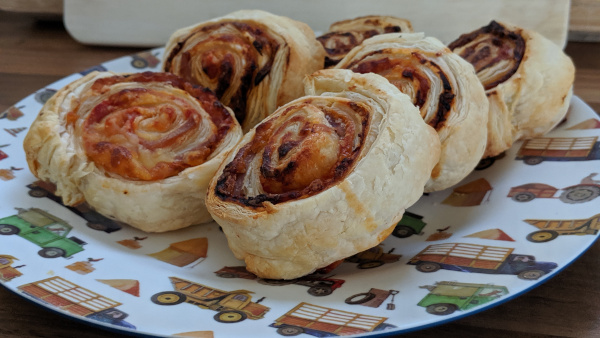
Another favourite here at Mumblog, Pizza Wheels are versatile, tasty, and brilliant for just popping straight into the lunchbox. You can add ingredients to suit your child’s tastes and they offer a scrumptious alternative to the humble sandwich. They are also very simple to make, thanks to the invention of ready rolled puff pastry!
Ingredients
- One sheet of ready rolled puff pastry, available from most supermarkets
- A couple of handfuls of grated cheese (enough to cover the pastry)
- Two tablespoons of tomato puree
- One egg, beaten
- Pizza toppings of your choice – you can use ham, pepperoni, cooked sausage, olives, peppers, cooked chicken, sweetcorn, etc.
Method
- Pre-heat the oven to 200 degrees celcius.
- Unroll the puff pastry sheet out onto a large chopping board, keeping it on top of the greaseproof paper it is rolled up in.
- Spread the tomato puree all over the sheet, apart from one of the shorter edges.
- Sprinkle on the cheese so that it is evenly spread all over. You can use any grated cheese.
- Sprinkle over the toppings evenly. If you are using olives it’s best to slice them so they lay flat as that makes it easier to roll.
- Brush the short edge that you left clear of tomato puree with egg, as you will use this to seal the roll.
- Begin rolling carefully from the other short edge. You can use the greaseproof paper to help you lift the pastry as you start rolling. Try to roll it so that’s fairly tight, but not so tight that you squeeze the toppings out from the sides. When you reach the end, the edge with the egg should stick firmly down, creating a seal.
- Refrigerate the roll as it is for about 15 minutes, then slice it up just like you would with a Swiss Roll cake, making slices that are about 1 inch thick.
- Line a tray with greaseproof paper and place each slice down, leaving an inch or so in between each piece to allow room for expansion. Brush each slice with the egg.
- Bake for about 20 minutes, or until golden brown and crispy. Once cooled these can be wrapped individually and frozen.
Mix It Up: If your child isn’t keen on tomato puree or you fancy a change, you can use BBQ sauce as a base instead. This goes particularly well with chicken, bacon, sweetcorn, and peppers.
Sandwiches & Wraps
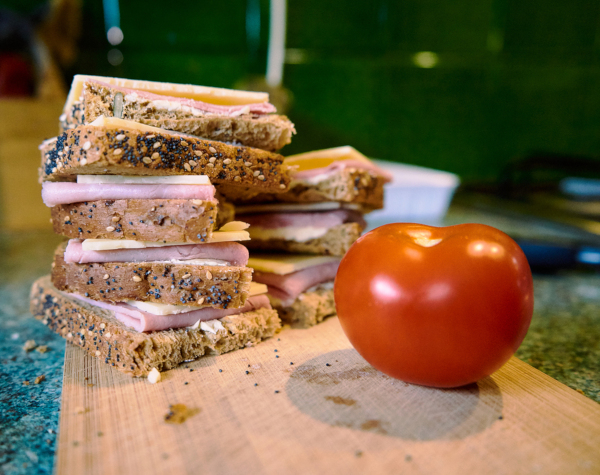
Sandwiches generally taste much better when made fresh, but if you are short on time then there is nothing wrong with making a batch of sandwiches in advance that you can then take out of the freezer and pop into the lunch box. However, not every sandwich filling freezes well and it’s important to take steps to ensure you don’t get freezer burn or very dry bread. Follow these tips and you should be good to go:
- Use the freshest bread possible, preferably bread that you have purchased that morning. The older the bread is, the drier it will be once it has defrosted. Wholemeal bread tastes better defrosted than white bread.
- Most meat and fish fillings freeze well, so make excellent fillings for freezer sandwiches.
- Not all cheese freezes well. Cottage cheese and cream cheese doesn’t work at all thanks to the water content. Cheese from blocks, such as Chedder, can be very crumbly once defrosted. The best way to add cheese to your sandwiches for freezing is to grate it. Alternatively, cheese spreads, such as Dairylea, also work well when frozen in sandwiches.
- Most pickles, condiments, and spreads, including jam and peanut butter, can be frozen in sandwiches.
- Salad items, such as lettuce, cucumber, and tomato do not freeze well. The water content will make the sandwiches very soggy once defrosted.
Tortilla wraps offer a great alternative to sandwiches, especially for younger children, as they can be sliced into mini rolls that are perfectly shaped for little hands. Wraps can also be frozen, just make sure you follow the same tips about fillings above.
Egg Muffins

These egg muffins are so simple to make, your children can help do it. Getting kids involved in the kitchen is a great way to encourage them to try new dishes. The muffins can be put in a lunchbox, or used for a protein fuelled breakfast. You can adapt the recipe as you please to suit your child’s tastes and be as adventurous as you like! This recipe makes 12 muffins.
Ingredients
- 8 large eggs
- 125g of cheese, grated
- 100g of cooked smoked sausage, chopped (you can also use ham)
- Six white mushrooms, chopped
- A handful of kale leaves, roughly chopped
- Olive oil to grease the tin
Method
- Pre-heat the oven to 175 degrees Celsius. Using olive oil, grease a muffin tin. Alternatively, you can use cupcake cases, which means there is less mess to clean at the end.
- Beat the egg in a jug and stir in the grated cheese. Divide the mixture equally in the muffin tin sections and set aside.
- In a frying pan, heat a little oil and gently fry the smoked sausage, mushrooms, and kale until soft. Spoon into the muffin cases equally on top of the egg mixture.
- Bake in the oven for about 20 minutes until firm.
- Once cool, wrap individually to place in the freezer. Alternatively, they will keep in the fridge for around 5 days.
Three Ingredient Energy Balls

These little balls of goodness are scrumptiously sweet and sugar free! They can be frozen, but they also keep in the fridge for about three weeks, as long as you store them in an airtight container.
In this recipe, we use almonds, which might not be appropriate for your child’s lunchbox if your school is completely nut free. On the other hand, they can also be excellent for a post-school snack, packing lots of much needed energy.
Ingredients
- 200g of dried dates with stones removed; Medjool dates work best, but you can use regular dates instead
- 100g of ground almonds; You could try coconut flower or ground up sunflower seeds as a nut free alternative
- 2 tsp of cocoa powder, plus extra for decoration
Method
- Using a food processer, pulverise the dates until you have a smooth paste.
- Mix in the ground almonds and cocoa powder.
- Scoop out a heaped dessert-spoon full of mixture at a time and using your hands roll the mixture into balls and set aside on a sheet of baking paper.
- Once you have used all the mixture, sprinkle a small amount of cocoa powder onto a plate and gently roll each ball through the powder, giving it a good coating.
- Add a little optional decadence by then rolling each ball in some melted dark chocolate to create a chocolate truffle treat.
Frozen Fruit Cups
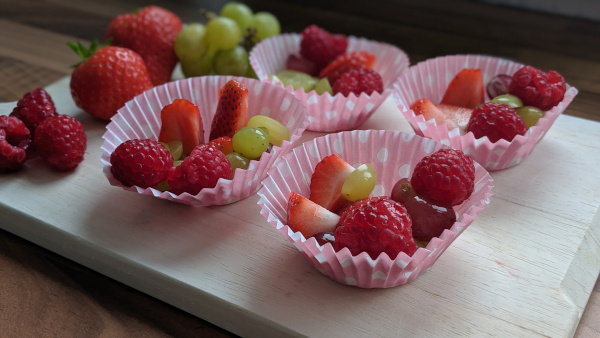
Chopping up grapes is a necessary chore to prevent possible choking in children, especially in school when they might be rushing their food so they can get back to playing. Bulk chopping and then freezing can cut down on the preparation time. Instead of just doing grapes, you can add in some berries into the mix, such as strawberries, raspberries, and blueberries.
Divide them up and put into silicone cupcake cases. Place them on a tray and place in the freezer for a few hours. Once they are frozen they can be removed from the tray and stored in the freezer in a box or bag. It’s worth noting that the fruit may be a little mushy once defrosted, which some children might object to.
Quesadillas

Perfect for a grab and go lunch, quesadillas offer up a wealth of opportunity for different fillings, meaning that you adapt them to suit your child’s tastes. This recipe uses chicken thighs which are very cheap to buy, keeping the costs right down, but it does involve extra time and faff. If you value time and convenience over cash, then substitute the chicken thighs for some pre-cooked chicken breast. Going veggie? Sliced halloumi cheese makes a great alternative.
Ingredients
- 4 chicken thighs
- 1 tablespoon BBQ sauce
- 8 large tortillas
- 200g grated cheese (Mozzarella works best but you can substitute any hard cheese)
- 215g can of kidney beans, drained
- 2 large spring onions
- 5 tablespoons of ready made salsa sauce (approx.)
- 5 tablespoons of sour cream (approx.)
- 5 tablespoons of sweetcorn, cooked
- Olive oil, for frying
Method
- Place the chicken thighs in an oven dish and bake in a pre-heated oven for 40 minutes at 200 degrees Celsius.
- Whilst the chicken is cooking, finely chop the spring onion.
- Drain the kidney beans and mash with a fork. Then heat a little oil in a pan and fry the beans and the spring onion together, for about five minutes. Set aside.
- Once the chicken thighs are cooked, leave them to cool slightly (to avoid burning your fingers) and then pull them apart to remove the meat from the skin and bone. Place the meat in a bowl and stir in the BBQ sauce so that all the chicken is coated.
- Take one tortilla and lay flat on a chopping board. Sprinkle a small amount of cheese on one half of the tortilla. Then, on the same half add small amounts of the chicken, sweetcorn, bean & onion mix, salsa, and sour cream. You will have enough ingredients to fill 8 tortillas, and it’s best not to overfill them, as it makes cooking difficult.
- Finally, sprinkle an additional amount of cheese on top of the filling, and fold over the clean half of the tortilla, to create a semi circle shape.
- Slice the tortilla in half, creating two quarter circle shapes, and set aside. Repeat this for the remaining tortillas until you have 16 quarter circles to cook.
- Heat around a tablespoon of oil in a large frying pan on a moderate heat and place the tortillas gently into the pan. Depending on the size of your pan you can cook up to three or four at a time.
- Fry each tortilla for a couple of minutes and then using a fish slice gently turn each one over. They should have a nice golden brown colour. Fry on the other side for another two minutes and then remove from the heat. Cook the rest of the slices in the same way. You may need to add additional oil in between slices.
- Allow to cool completely before wrapping each one individually and placing into the freezer. Alternatively, serve them up as an evening meal, with vegetable crudités, salsa, and dips of your choice.
Making Packed Lunches More Appealing

If your child is a bit fussy, or you simply want to brighten their day, then there are few ways of making their packed lunches a bit more appealing. Bento boxes are great for children’s packed lunches because it offers them a varied choice in small portions. Your child can have a mixture of the foods they love, as well as small tastes of some items that they are less keen on, and you can include vegetable sticks and dips to help them reach that 5 a day target.
We love bento box lunch boxes as they come with different removable pots that can be filled with things like yogurt and smaller trays that are ideal for dip. The best thing about using a bento box is that because each compartment keeps the food separate, there is no need to use cling film or food bags.
Another top tip is to include a small note in your child’s lunchbox. It might be a joke, or just a message to say that you love them. It’s a great way to let your child know that you’re thinking of them during the day at school.